
Mahlinas - Multipurpose Online Store Blogger Template
- Created : 27/07/2023
- Author : https://www.threads.net/@rian_seo
Basic Setup
- Template Installation
- Logo Setup
- Favicon Setup
- Meta Description Blogger
- Changed
httptohttpsBlogger URL - Set Number of Product Posts
- Setting Language, Clock & Product Date
- Setting robot.txt and robot tags
Template Setting
- Setting WhatsApp
- Setting Text Template
- Setting Payment
- Setting Shipping
- Setting Help
- Setting Menu Header
- Setting Image Slider
- Setting Customize Color
Setting Post Product
Setting Widget Template
Setting WhatsApp
Open Blogger > Layout > Widget WhatsApp Setting
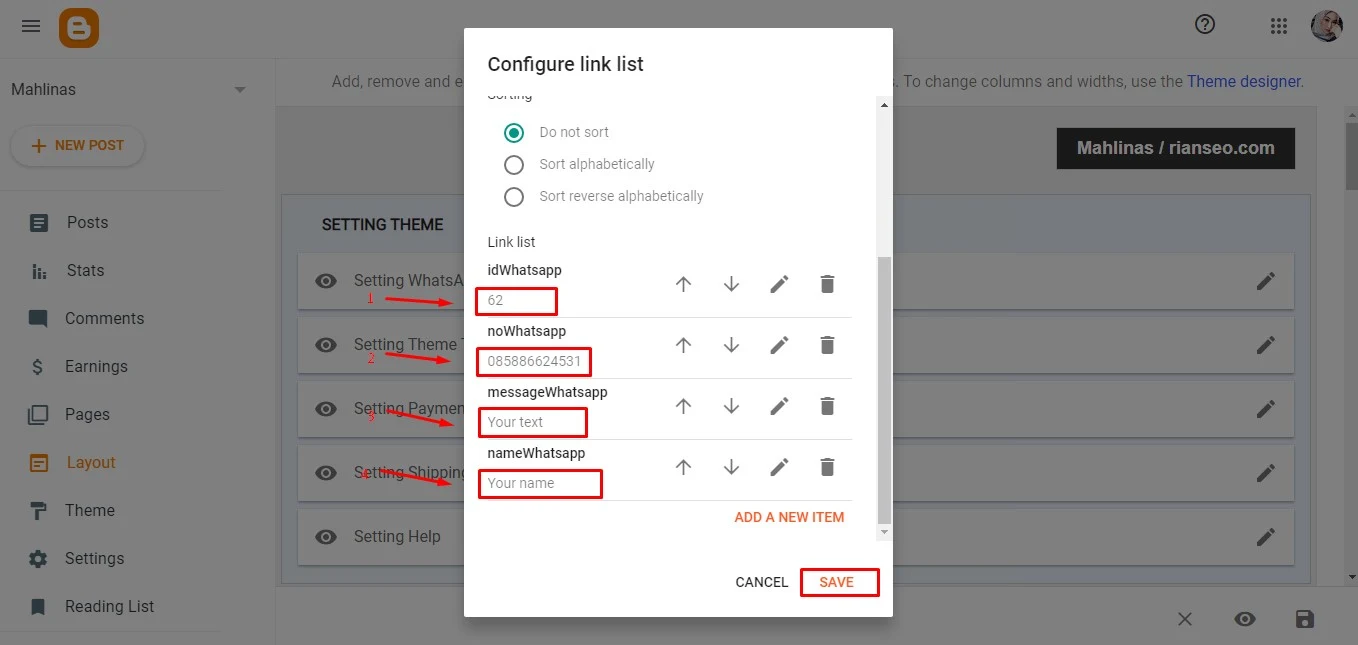
Information
- Change the text marked in red only.
ID WhatsApp/Your Number WhatsApp/Your Text/Your Name - Do not delete codes that are not marked in red
- Don't add any code
Setting Text Template
Open Blogger > Layout > Widget Setting Theme Text
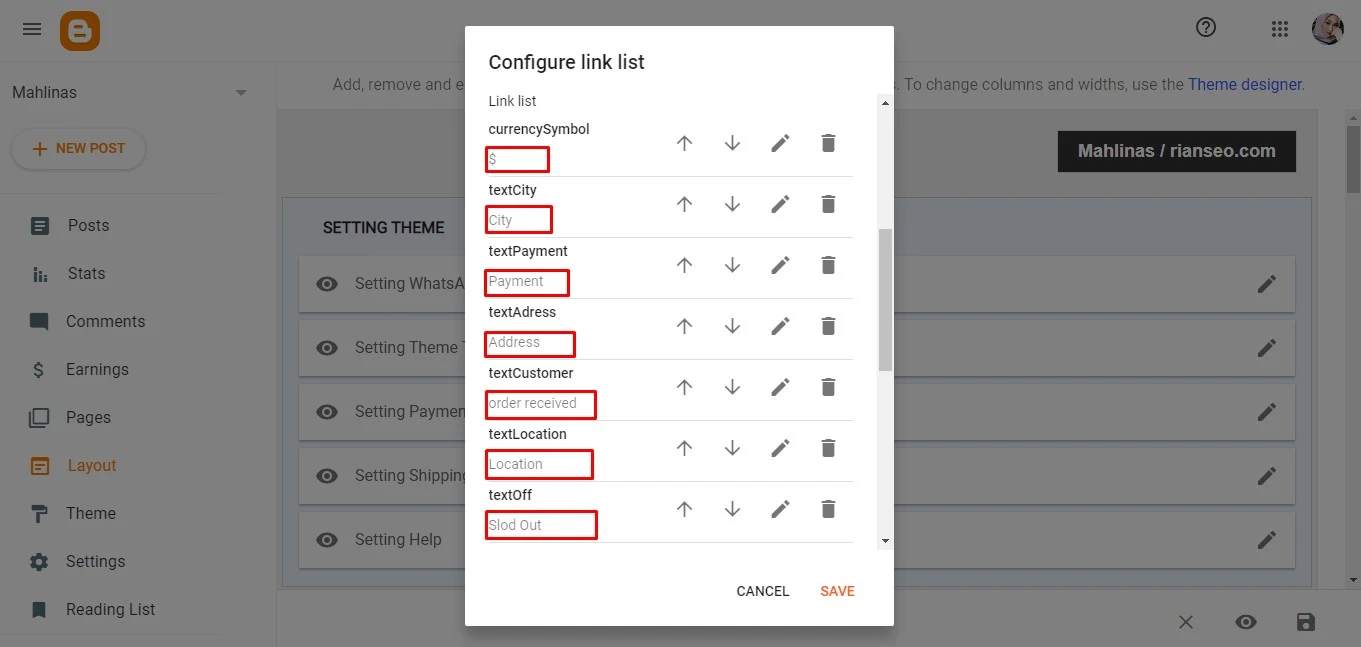
Information
- Change the text marked in red only.
- Do not delete codes that are not marked in red
- Don't add any code
Setting Payment
Open Blogger > Layout > Widget Setting Payment
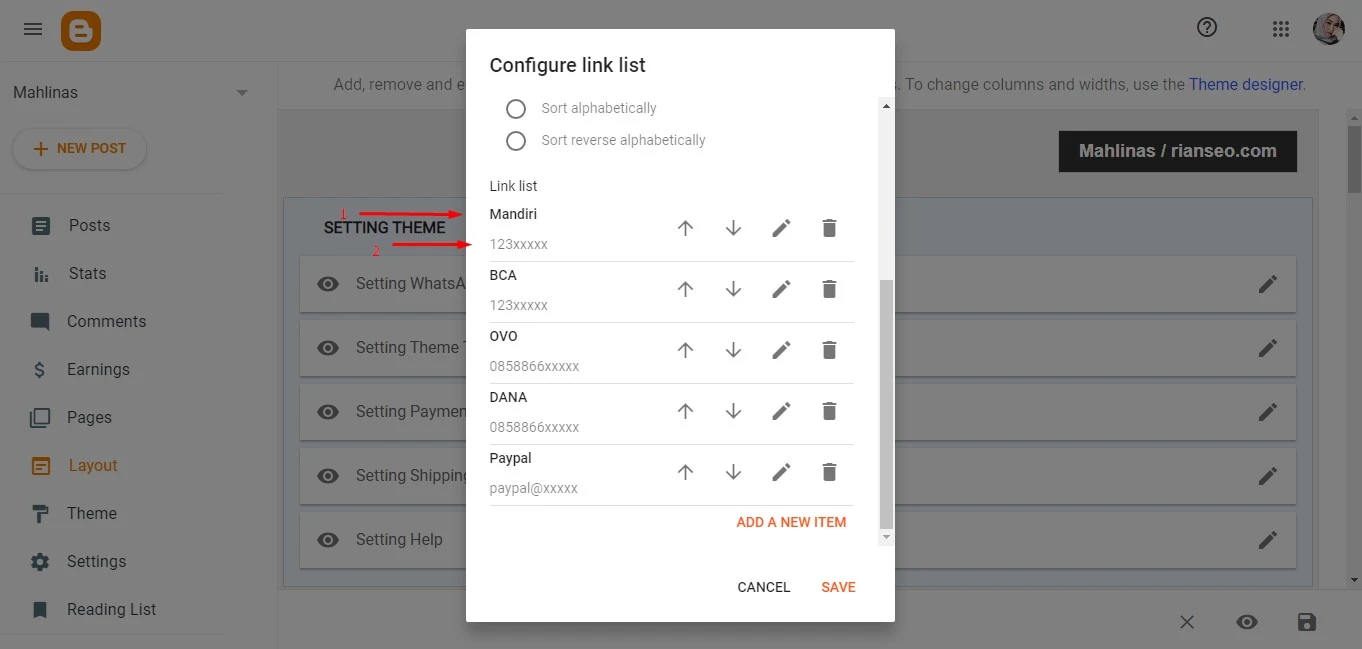
Information
- You can add or edit writing data text.
- Site name > Your name bank
- Site URL > Your number bank
Setting Shipping
Open Blogger > Layout > Widget Setting Payment

Information
- You can add or edit writing data text.
- Site name > Your name Delivery service
- Site URL > Available / Unavailable
Setting Help
Open Blogger > Layout > Widget Setting Help

Information
- You can add or edit writing data text.
- Site name > Writing questions about help.
- Site URL > Help answer.
Setting Post type HTML
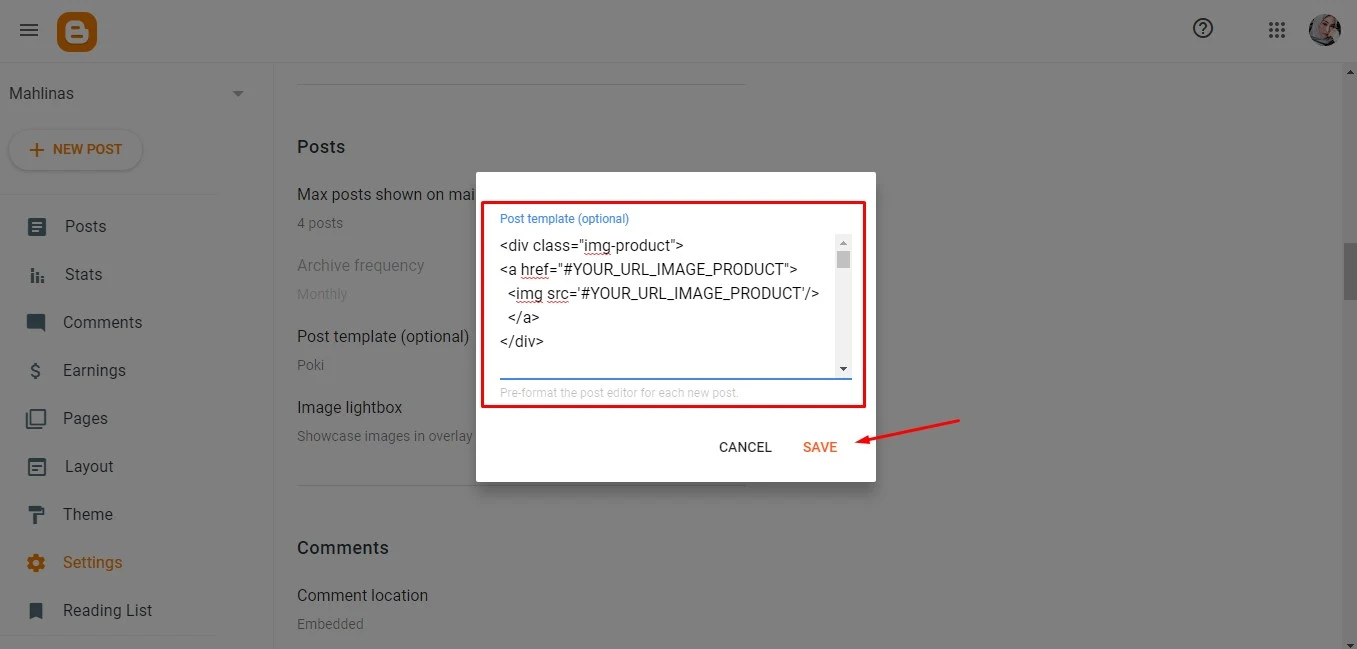
Open Blogger > Setting > Post template (optional)
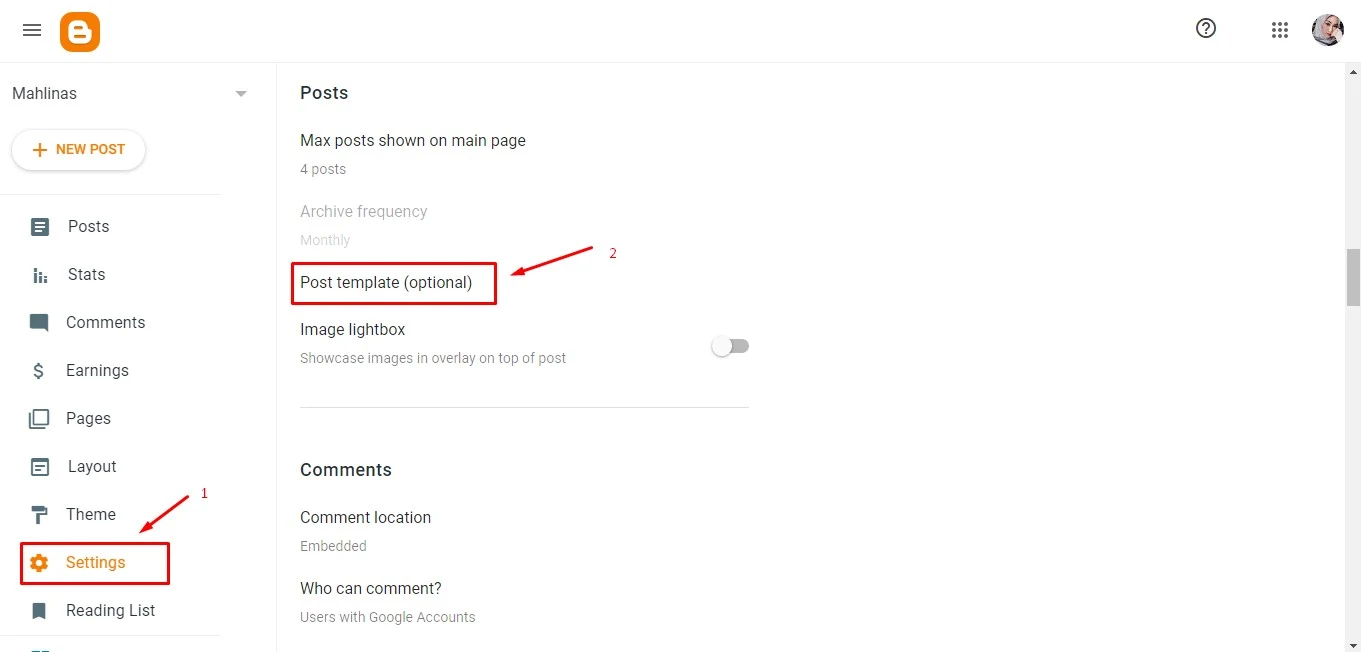
Copy this HTML
<div class="img-product">
<a href="#YOUR_URL_IMAGE_PRODUCT">
  <img src='#YOUR_URL_IMAGE_PRODUCT'/>
  </a>
</div>


<div class="status-product" data-stock="on">

  <span class="hide" itemprop="price">240</span>

  <span class="item-price" data-discount-percent="0">240</span>

  <!-- data-discount-percent='0' Product not price with diskon, you can set '50' or other number for product price diskon -->

  <div class="option-product" id="Color">
    <div id='red'>COLOR PRODUCT</div>
  </div>

  <div class="option-product" id="Size" data-detail='#YOUR_URL_IMAGE_DETAIL'>
    <div>SIZE PRODUCT</div>
  </div>

  <div class="detailDescription">
    <p>Your text description product.</p>
    <table>
      <tbody>
        <tr>
        <td>Table 1</td>
        <td>Table 2</td>
        <td>Table 3</td>
        <td>Table 4</td>
        </tr>
        <tr>
          <td>Table Detail 1</td>
          <td>Table Detail 2</td>
          <td>Table Detail 3</td>
          <td>Table Detail 4</td>
        </tr>
        <tr>
          <td>Table Detail 1</td>
          <td>Table Detail 2</td>
          <td>Table Detail 3</td>
          <td>Table Detail 4</td>
        </tr>
        <tr>
          <td>Table Detail 1</td>
          <td>Table Detail 2</td>
          <td>Table Detail 3</td>
          <td>Table Detail 4</td>
        </tr>
      </tbody>
    </table>
  </div>
</div>
Paste HTML in Post template (optional)
Create Post Product
Open Blogger > Post > New Post
Information
- Set your title product.
- Upload your image product and paste URL image in
#YOUR_URL_IMAGE_PRODUCT> Learn more. - Set price product > ex:
240. - Set discon price product >
data-discount-percent='0'ex:50 / 20 / 30 / 70. - Set option product >
COLOR PRODUCT&SIZE PRODUCT - Set table text and table description > See an example.
- Set label and Search description
- Publish your post product!
Setting Widget Mail Subscribe
Open Blogger > Layout > Widget MailChimp

Information
- You can edit Title and Caption writing data text.
- Link > Paste it with link
Subscribe form URL. - Image > Default.
How to Get The Mailchimp Subscribe Form URL?
You can get the link easily by following the steps below.
A – Create a free account on Mailchimp – Create Now
B – After creating your account go to Audience > Signup forms > Form builder.

C – Create and customize your form according to your needs.
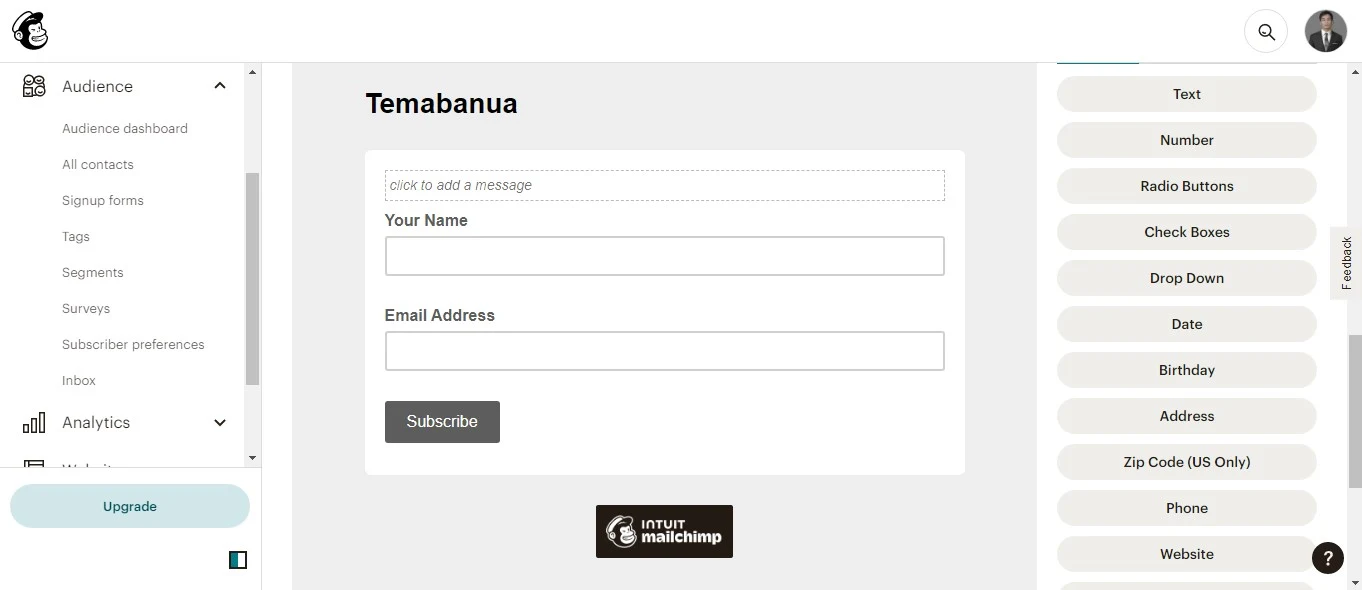
D – Copy and access the Signup form URL.

E – After the page loads, Copy the final Subscribe Form URL into your browser’s address bar.

Setting Widget Footer Social Media
Open Blogger > Layout > Widget Keep in Touch
Information
Site name > Name Social Media.
Support icon :
Facebook\Twitter\Linkedin\Instagram\Pinterest\Youtobe.- URL > Your URL social media name.
Setting Footer Icon Image
Open Blogger > Layout > Widget Shipping Support
- Site name > Name Icon.
- Site URL > URL Image Icon.
12 件のコメント
Saya berencana mau arahkan link pembeliannya ke toko saya di web yg lain. Terima kasih
<i rel="pre"></i>コードブロック用<i rel="blockquote"></i>引用用<i rel="code"></i>数語のコード用<i rel="img">URL image<i>画像を貼り付けるため(他の場所にホスティングする必要があります)